Kindergarten HTML5/CSS3 Template
By: Crafted PixelsHTML Files & Structure
Kindergarten is a fully responsive HTML5/CSS3 template based on Bootstrap 3, W3C Markup Validated, Retina-Ready and cross-browser compatible.
- Contact form requires a real web server (local or online);
- Google Maps app requires an internet connection.
The template's main component parts are: header, content and footer. The html is heavily commented, for easy modifications, and the main structure looks like this:
1. Home Page
<div class="container" id="wrapper">

    <!-- header -->
    <header>
        header content goes here (including main navigation)
    </header>
    <!-- end header -->

    <!-- front page header featured area -->
    <section id="featured">
        content goes here (the slider)
    </section>
    <!-- end front page header featured area -->

    <!-- page content area -->
    <section id="content-homepage">
        content goes here
    </section>
    <!-- end page content area -->

    <footer>
        footer content goes here
    </footer>

</div>
2. All other pages
<div class="container" id="wrapper">

    <!-- header -->
    <header>
        header content goes here (including main navigation)
    </header>
    <!-- end header -->

    <!-- page content area -->
    <section id="content" class="col-lg-7 col-md-8 col-sm-12">
        content goes here
    </section>
    <!-- end page content area -->

    <footer>
        footer content goes here
    </footer>

</div>
-
Header contains the logo (the default logo is logo.png found in images folder) and the main navigation. The default logo is 68x68 pixels, but you can add your logo in a different size, without modifying anything else.
<!-- header --> <header> <a href="index.html" class="logo"> <img src="images/logo.png" alt="" /> </a> <nav role="navigation"> <!-- Brand and toggle get grouped for better mobile display --> <div class="navbar-header"> <button type="button" class="navbar-toggle" data-toggle="collapse" data-target=".navbar-ex1-collapse"> <span class="sr-only">Toggle navigation</span> <span class="fa"></span> </button> </div> <!-- Collect the nav links, forms, and other content for toggling --> <div class="collapse navbar-collapse navbar-ex1-collapse"> <ul> <li class="active"><a href="index.html">Home</a></li> <li><a href="about.html">About us</a></li> <li><a href="gallery.html">Gallery</a></li> <li><a href="blog.html">Blog</a></li> <li><a href="contact.html">Contact</a></li> </ul> </div><!-- /.navbar-collapse --> <div id="sun"></div> </nav> <div class="clearfix"></div> </header> <!-- end header -->
-
Content structure:
1. Home Page
<!-- page content area -->
<section id="content-homepage">

    <div class="col-lg-3 col-md-4 col-sm-4 col-xs-12">
        yellow column content goes here
    </div>
    <div class="col-lg-3 col-md-4 col-sm-4 col-xs-12">
        green column content goes here
    </div>
    <div class="col-lg-3 col-md-4 col-sm-4 col-xs-12">
        orange column content goes here
    </div>

</section>
<!-- end page content area -->
2. All other pages
<!-- page content area -->
<section id="content" class="col-lg-7 col-md-8 col-sm-12">

    <div class="cloud">
        <h1>Page Title Here</h1>
    </div>
    <div class="content-bg">
        page content goes here
    </div>

</section>
<!-- end page content area -->
-
Footer contains copyright data and social media icons/links.

All icons are webfont format (FontAwesome), so they look just as perfect on Retina and HiDPI screens. By default are included Google+, Facebook, Twitter, Instagram, LinkedIn, Pinterest and YouTube, but any other FontAwesome icons can be added.
CSS Files & Structure
Kindergarten uses three css files: style.css, font-awesome.css and bootstrap.min.css (the minified version of Bootstrap 3 css, for performance reasons. Non-minified version is also included with the theme). The template doesn't have separate CSS file for IE, but uses Paul Irish's conditional classes, so it has a custom class for this purpose: .ie8. All the css rules that start with .ie8 will target only IE8. These rules are W3C valid.
In order for this class to work, at the beginning of the code there are some conditional comments:
<!--[if IE 8 ]> <html class="ie8 no-js"> <![endif]-->
<!--[if (gte IE 9)|!(IE)]><!--> <html class="not-ie no-js"s>  <!--<![endif]-->
First line targets IE8, and the second line targets any browser other than IE8.
You can find comments in Kindergarten.css, as css rules are grouped. These are the groups:
- 01: Fonts and Bootstrap css import
- 02: General body, responsive img, wrapper background, content
- 03: Header and main navigation
- 04: Buttons and form elements
- 05: PrettyPhoto
- 06: Homepage
- 07: Homepage - WOW Slider
- 08: Homepage - other elements
- 09: Pages
- 10: Pages - Blog
- 11: Pages - Contact - Google Maps
- 12: Media Queries
- 13: CSS for Retina (HiDPI) Display
Grid
Kindergarten is based on Bootstrap 3 grid.
You can find more information on the Boostrap framework website getbootstrap.com, in the documentation grid section: getbootstrap.com/css/#grid.
Elements
You can find all the elements that can be used here: getbootstrap.com/components/.
Typography
Kindergarten uses 3 fonts (all included):
- BD Cartoon Shout – used for titles and in the logo;
- Royaltea’s color is Violette – used in the logo;
- Solomon Normal – premium font used everywhere else (body text etc.).
JavaScript
To optimize performance, Kindergarten template includes all the scripts in the footer, before </body> tag. The only scripts included in the <head> are Modernizr.js and Respond.js, which are mandatory to be included that way in order to work (they have to load before the page is loaded).
The scripts included are the following (each script is explained below):
<script src="js/jquery-1.10.1.min.js"></script> - jQuery library
<script src="js/bootstrap.min"></script> - Main Bootstrap scripts
<script src="js/custom.js" defer></script> - Custom template scripts
<script src="js/jquery.prettyPhoto.js"></script> - PrettyPhoto lightbox script
Homepage has two additional javascript files:
<script src="js/wowslider.js"></script> - main WOWSlider script
<script src="js/wowtransition.js"></script> - WOWSlider transition effect
Contact page has some additional javascript:
<script src="//maps.google.com/maps/api/js?sensor=false"></script> - Google Maps API
<script src="js/gmaps.js"></script> - Gmaps.js app
+ Some inline code for calling Google Maps function.
WOW Slider
WOWSlider is properly licensed and is bundled with Kindergarten.
To add images to the slider, follow these steps:
- Add your image to the images > wowslider folder. You can delete or overwrite the demo images (01.png, 02.png and 03.png).
- Open index.html. WOWSlider code looks like this (the first image is highlighted):
<!-- WOWSlider -->
<div id="wowslider-container1">
    <div class="ws_images">
    <ul>
    <li><img src="images/wowslider/01.png" alt="This is the title" title="This is the title" id="wows1_0"/>And this is description</li>
    <li><img src="images/wowslider/02.png" alt="Another title" title="Another title" id="wows1_1"/>And another description</li>
    </ul>
    </div>
    <div class="ws_bullets">
        <div>
            <a href="#" title="This is the title">1</a>
            <a href="#" title="Another title">2</a>
        </div>
    </div>
</div>
<!-- end WOWSlider -->
For each image you have to add code like the first image (the highlighted code). For example (new image code highlighted):
<!-- WOWSlider -->
<div id="wowslider-container1">
    <div class="ws_images">
        <ul>
            <li><img src="images/wowslider/01.png" alt="This is the title" title="This is the title" id="wows1_0"/>And this is description</li>
            <li><img src="images/wowslider/02.png" alt="Another title" title="Another title" id="wows1_1"/>And another description</li>
            <li><img src="images/wowslider/03.png" alt="Yet another title" title="Yet another title" id="wows1_2"/>And yet another description</li>
        </ul>
    </div>
    <div class="ws_bullets">
        <div>
            <a href="#" title="This is the title">1</a>
            <a href="#" title="Another title">2</a>
            <a href="#" title="Yet another title">3</a>
        </div>
    </div>
</div>
<!-- end WOWSlider -->
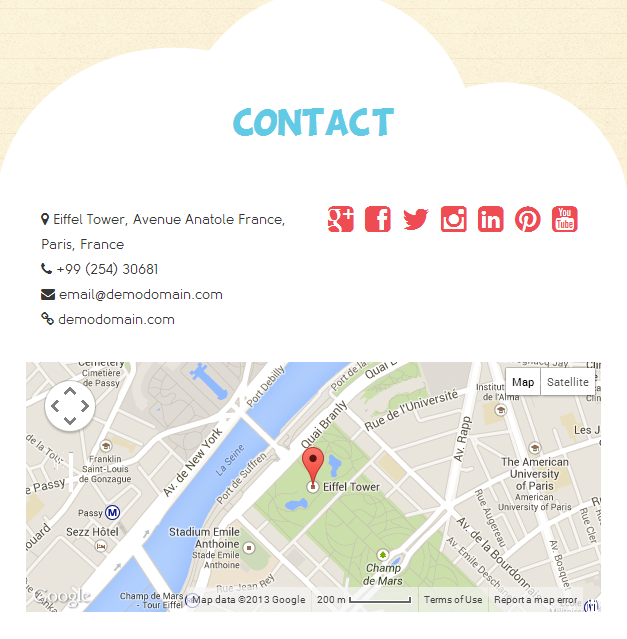
Google Maps app
The Google map is automatically focusing on the address that you input in the html.
Just replace "Eiffel Tower, Avenue Anatole France, Paris, France" with your own address and refresh the page.
<div class="col-lg-6 col-sm-12">
<span class="fa"></span> <span id="address">Eiffel Tower, Avenue Anatole France, Paris, France</span> <!-- input
your address on this line -->
<span class="fa"></span> +99 (254) 30681
<span class="fa"></span> email@demodomain.com
<span class="fa"></span> demodomain.com
</div>
Contact form
To use the contact form, you must replace yourmail@demo.com with your email on line 49 of contact.php file (located in "contact-form" folder).
Please note that using the contact form requires an actual server.
PSD Files
You can find the .psd files in the "PSD-files" folder.
12 psd files are included (6 @1x for normal displays and 6 @2x for retina displays) plus 2 psd files with the background texture (@1x and @2x). The files are organized in 3 folders:
-
@1x
- Homepage - 01_kindergarten_homepage.psd
- About - 02_kindergarten_about_us.psd
- Gallery - 03_kindergarten_gallery.psd
- Blog - 04_kindergarten_blog.psd
- Blog post - 05_kindergarten_blog_post.psd
- Contact - 06_kindergarten_contact.psd
-
@2x
- Homepage - 01_kindergarten_homepage@2x.psd
- About - 02_kindergarten_about_us@2x.psd
- Gallery - 03_kindergarten_gallery@2x.psd
- Blog - 04_kindergarten_blog@2x.psd
- Blog post - 05_kindergarten_blog_post@2x.psd
- Contact - 06_kindergarten_contact@2x.psd
-
bg-texture
- linedpaper.psd
- linedpaper@2x.psd
General file structure
The psd files content is structured in three main groups: Header, Content and Footer.
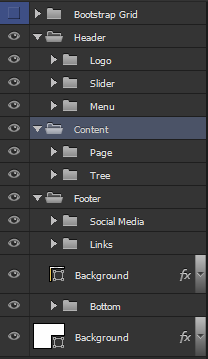
- Header contains: Logo, Main Menu and also the Slider (front-page only);
- Content is divided into Page (page content) and Tree (which contains all the vectors in the right side);
- Footer is divided into Social Media (left side), Links (right side) and Bottom (bottom copyright part).
All the layers are ordered, labeled and organized in groups.
Updates
-
V 6.0 [16.06.2015]
Updated PrettyPhoto to 3.1.6 -
V 5.0
Updated Documentation;
Made the slider visible on smaller mobile resolutions;
Added CSS Table of Contents. -
V 4.0
Replaced menu/titles font (BD Cartoon Shout) with Dimbo for diacritics support.
Added alternate font for cyrillic.
Added Subject field in the contact form. -
V 3.0
Added sub-menu for main nav. -
V 2.0
Updated Documentation;
Fixed background-size (lined-paper) on Retina. -
V 1.0
Initial release.
Sources and Credits
-
Fonts:
- BD Cartoon Shout – used for titles and in the logo;
- Royaltea’s color is Violette – used in the logo;
- Solomon Normal – premium font used everywhere else (body text etc.).
- Vectors and shapes: Vecteezy Premium or handcrafted by me (Alina Sava);
- Webfont Icons: FontAwesome;
- Patterns: subtlepatterns.com;
- WOW Slider - properly licensed, included in the template;
- Other scripts: getbootstrap.com;
- Images used in the demo (not included in the template): PhotoDune, graphicstock.com